Building sustainable trails involves some basic engineering concepts, construction techniques and various kinds of tools and equipment. If you are looking to build a trail, but do not know where to start, this is a great place for you to be!
Contents:
- Trail safety and PPE
- Tools and Their Uses
- Parts of a Trail
- What Makes a Trail “Good”?
- Surveying a Trail
- Trail Building
- Corridor and Rock Removal
- Tread
- Backslope
1. Trail Safety and PPE
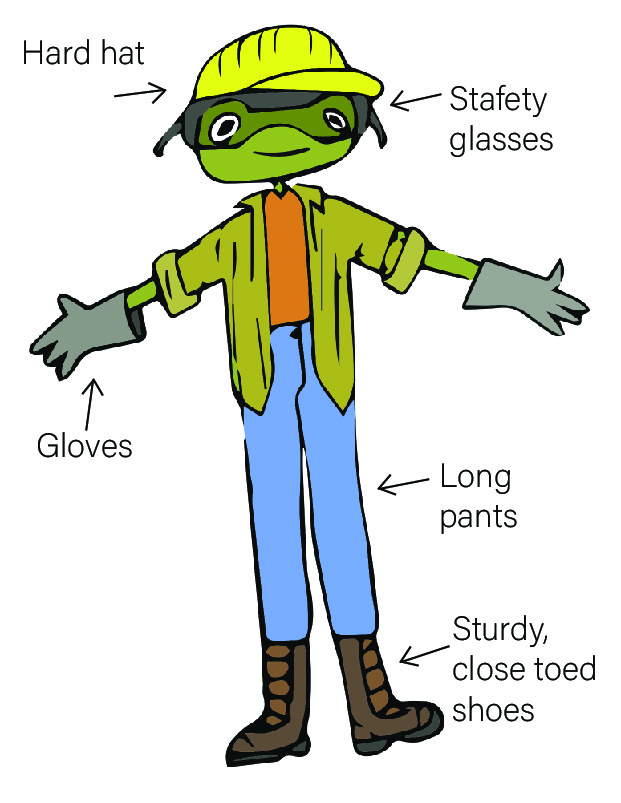
When working on trails it is important to stay safe – especially if you are working in remote areas with no cell service or vehicle access. This is why you should use your personal protective equipment (PPE). Here are some important trail building PPE that you can use to ensure safety of your trail builders.
- Gloves – Protect your hands from thorns, branches and more.
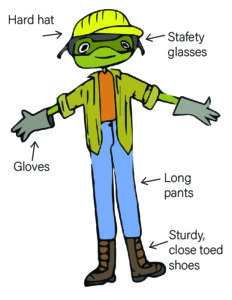
- Long pants – This limits risk of poison ivy and leg injuries. This will also help prevent bug bites and ticks.
- Boots – Footwear can be one of the most important parts of your trail experience. If you have to hike out to your trail building location, your feet will thank you for donning a pair of sturdy, leather boots. In particularly rocky/remote locations, you should not be able to bend your boot in half. If you can, that means the sole is not sturdy enough to with stand the hiking and labor you will be doing. A pair of wool socks will help keep your feet dry and happy.
- Safety glasses – When it comes to safety glasses, regular glasses and sunglasses do not cut it. Safety glasses should be rated Z87.1 +, meaning they are shatterproof, and, if you are hit with anything, shards of glass or plastic will not be embedded in your eyes.
- Hard hat – If working with many people on a trail, there is potential for flying rocks, falling tree limbs, or swinging trail tools. Although a trail team should maintain proper distance and awareness of their trail co-workers, hard hats can prevent accidents. Make sure that your hard hat is not older than five years, as the plastic can degrade over time and will not protect you. Check on the inside of the hard hat for the manufacturing date.
- Sunscreen – Nothing ruins a fun day of trail building like a bad sunburn!
- Tool specific PPE – If you are using a motorized tool like a chainsaw, it is advisable to take more safety precautions, such as wearing Kevlar chaps and ear protection. Make sure that you are properly trained before running any power equipment.
Other considerations for trail building include having a working first aid kit – preferably one with a first aid guide in case no one with you is trained. You should also have plenty of snacks and water, as you can get dehydrated fast when doing trail work.
Lastly, there is tool safety. Make sure that you store your tools on the uphill side of the trail with the handle going downward. This prevents the tools from being stepped on or tripped over. When carrying tools, it is important to carry them in the hand (not over your shoulder) with any sharp parts facing downward.
2. Tools and Their Uses
These are the tools that we use at the KTC. There are other trail tools out there too, but these are the basics.
The tools below are sorted based on their use.
Cutting tools
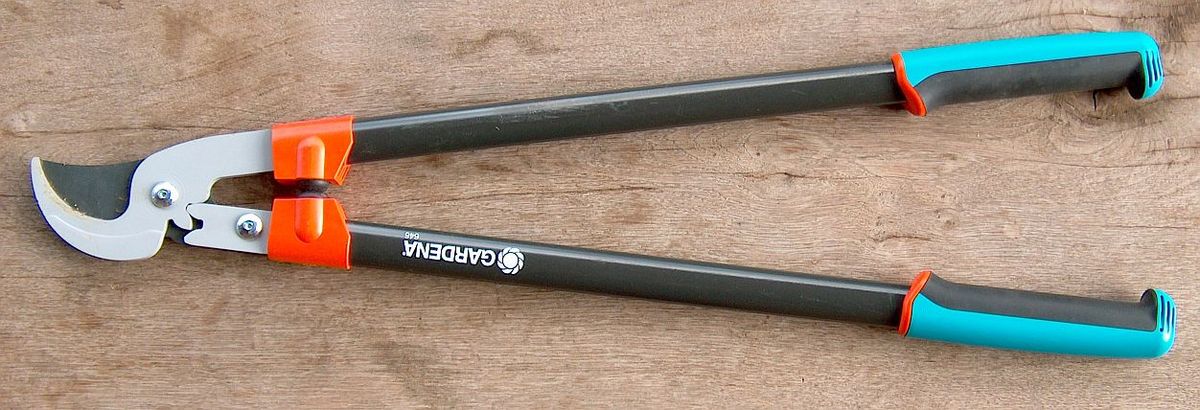
- Loppers – These are pruning tools that allow you to cut back small branches and shrubs.
 There are two main types of loppers: anvil and bypass. Anvil loppers have a blade that cuts when it closes against an anvil on the lower jaw. Conversely, bypass loppers have two blades, similar to a pair of scissors. Bypass loppers create a cleaner cut and can be used when you do not want to kill or harm the plant, only prune it. Do not cut a branch that is bigger in diameter than the handle of the loppers, or you risk breaking them.
 - Hand saws – There are many types of hand saws. The most commonly used hand saws for trail building are bow saws, triangle saws, fanno saws, and silky saws. These saws all function in the same way and require similar treatment. Saws should not cut through dirt or sand, as it will dull the saw. When cutting, use long strokes so that the entire blade of the saw is used. This way the blade dulls evenly, instead of having a saw with one really dull spot.
-
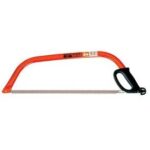
- Bow Saw
-
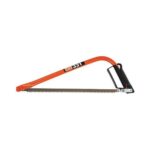
- Triangle Saw
-
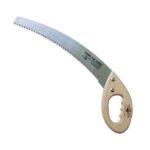
- Fanno Saw
-

- Silky Saw
Digging tools
What is an “adze”? Adze tools have an ax like blade, but it is parallel to the ground, allowing for digging in the dirt.
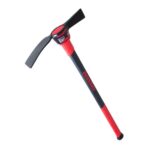
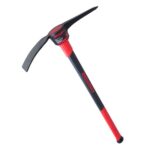
- Pulaski – A Pulaski is traditionally a firefighting tool with an ax and an adze head. It is useful for chopping trees, branches, and roots, as well as cutting and shaping trails. It is not used to pry rocks or stumps out of the ground as this may cause the handle to split.
- Mattock – Mattock tools have an adze blade on one side of the head. There are two main mattocks: the cutter mattock and the pick mattock. The cutter mattock has an ax opposing the adze blade, making it good for chopping roots. The pick mattock has a stout pick opposite the adze blade, allowing for prying of rocks and roots.
- Hazel hoe – Hazel hoes have a wide square shaped adze blade and a slender handle. They are best for more specific work when the trail is nearing finishing. They will not allow for aggressive digging in the dirt, but provide more control over smaller details.
-
- Cutter Mattock
-
- Pick Mattock
-
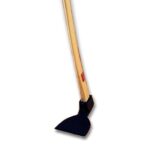
- Hazel Hoe
-
Tools for moving material
- Shovel – Shovels are great for moving dirt, but should not be used for digging. If there are many rocks in the trail, digging with the shovel will damage it. Reserve digging for mattocks and adze tools. Use the shovel only to pick up already lose dirt and move it.
- Wheelbarrow – These come in handy if you need to backfill a hole or move dirt to a specific location.
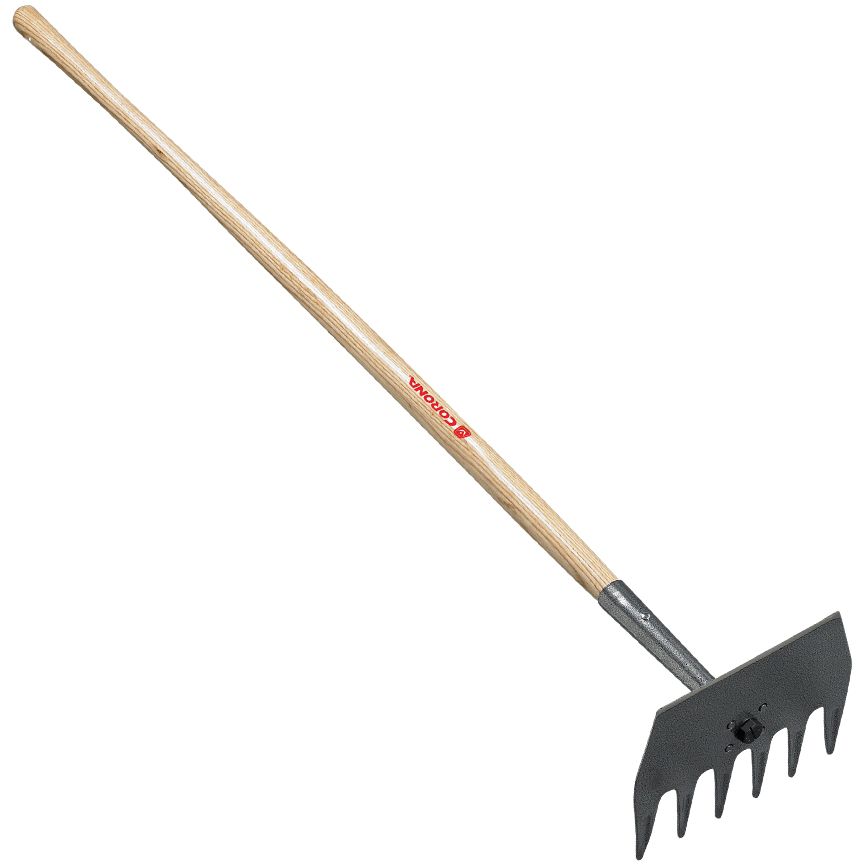
- McLeod – These are special rakes that
 help to smooth the trail and move dirt. The McLeod if often used to scrape loose dirt into a pile to be shoveled off the trail or the rake end can be used to pull up grass and light vegetation. McLeods should never be used to tamp. They have a bolt on the head of the tool that can break if used to tamp, and cannot be tightened later.
Misc Tools
- Sledge hammer – Sledges usually weigh between 5 to 15 pounds. They are used to break down larger rocks into smaller ones, often to backfill holes with gravel and dirt. Make sure to never use a sledge hammer that has a lose head, and to keep your back straight while sledging. Squat down instead of bending over to bring the hammer down.
- Rock bar – Rock bars are long heavy duty crowbars that pry large rocks out of the trail. Be careful when moving large rocks, and never place hands under a rock that is being held up by a rock bar.
- Rock basket – Also called a sling, these are strong fabric baskets that can be used to move large rocks that are too heavy for a single person to lift. Roll the rock into the sling and then lift from each side.
- Tamper – This is a pole with a square plate on the end used to tamp down dirt after backfilling.
3. Parts of a Trail
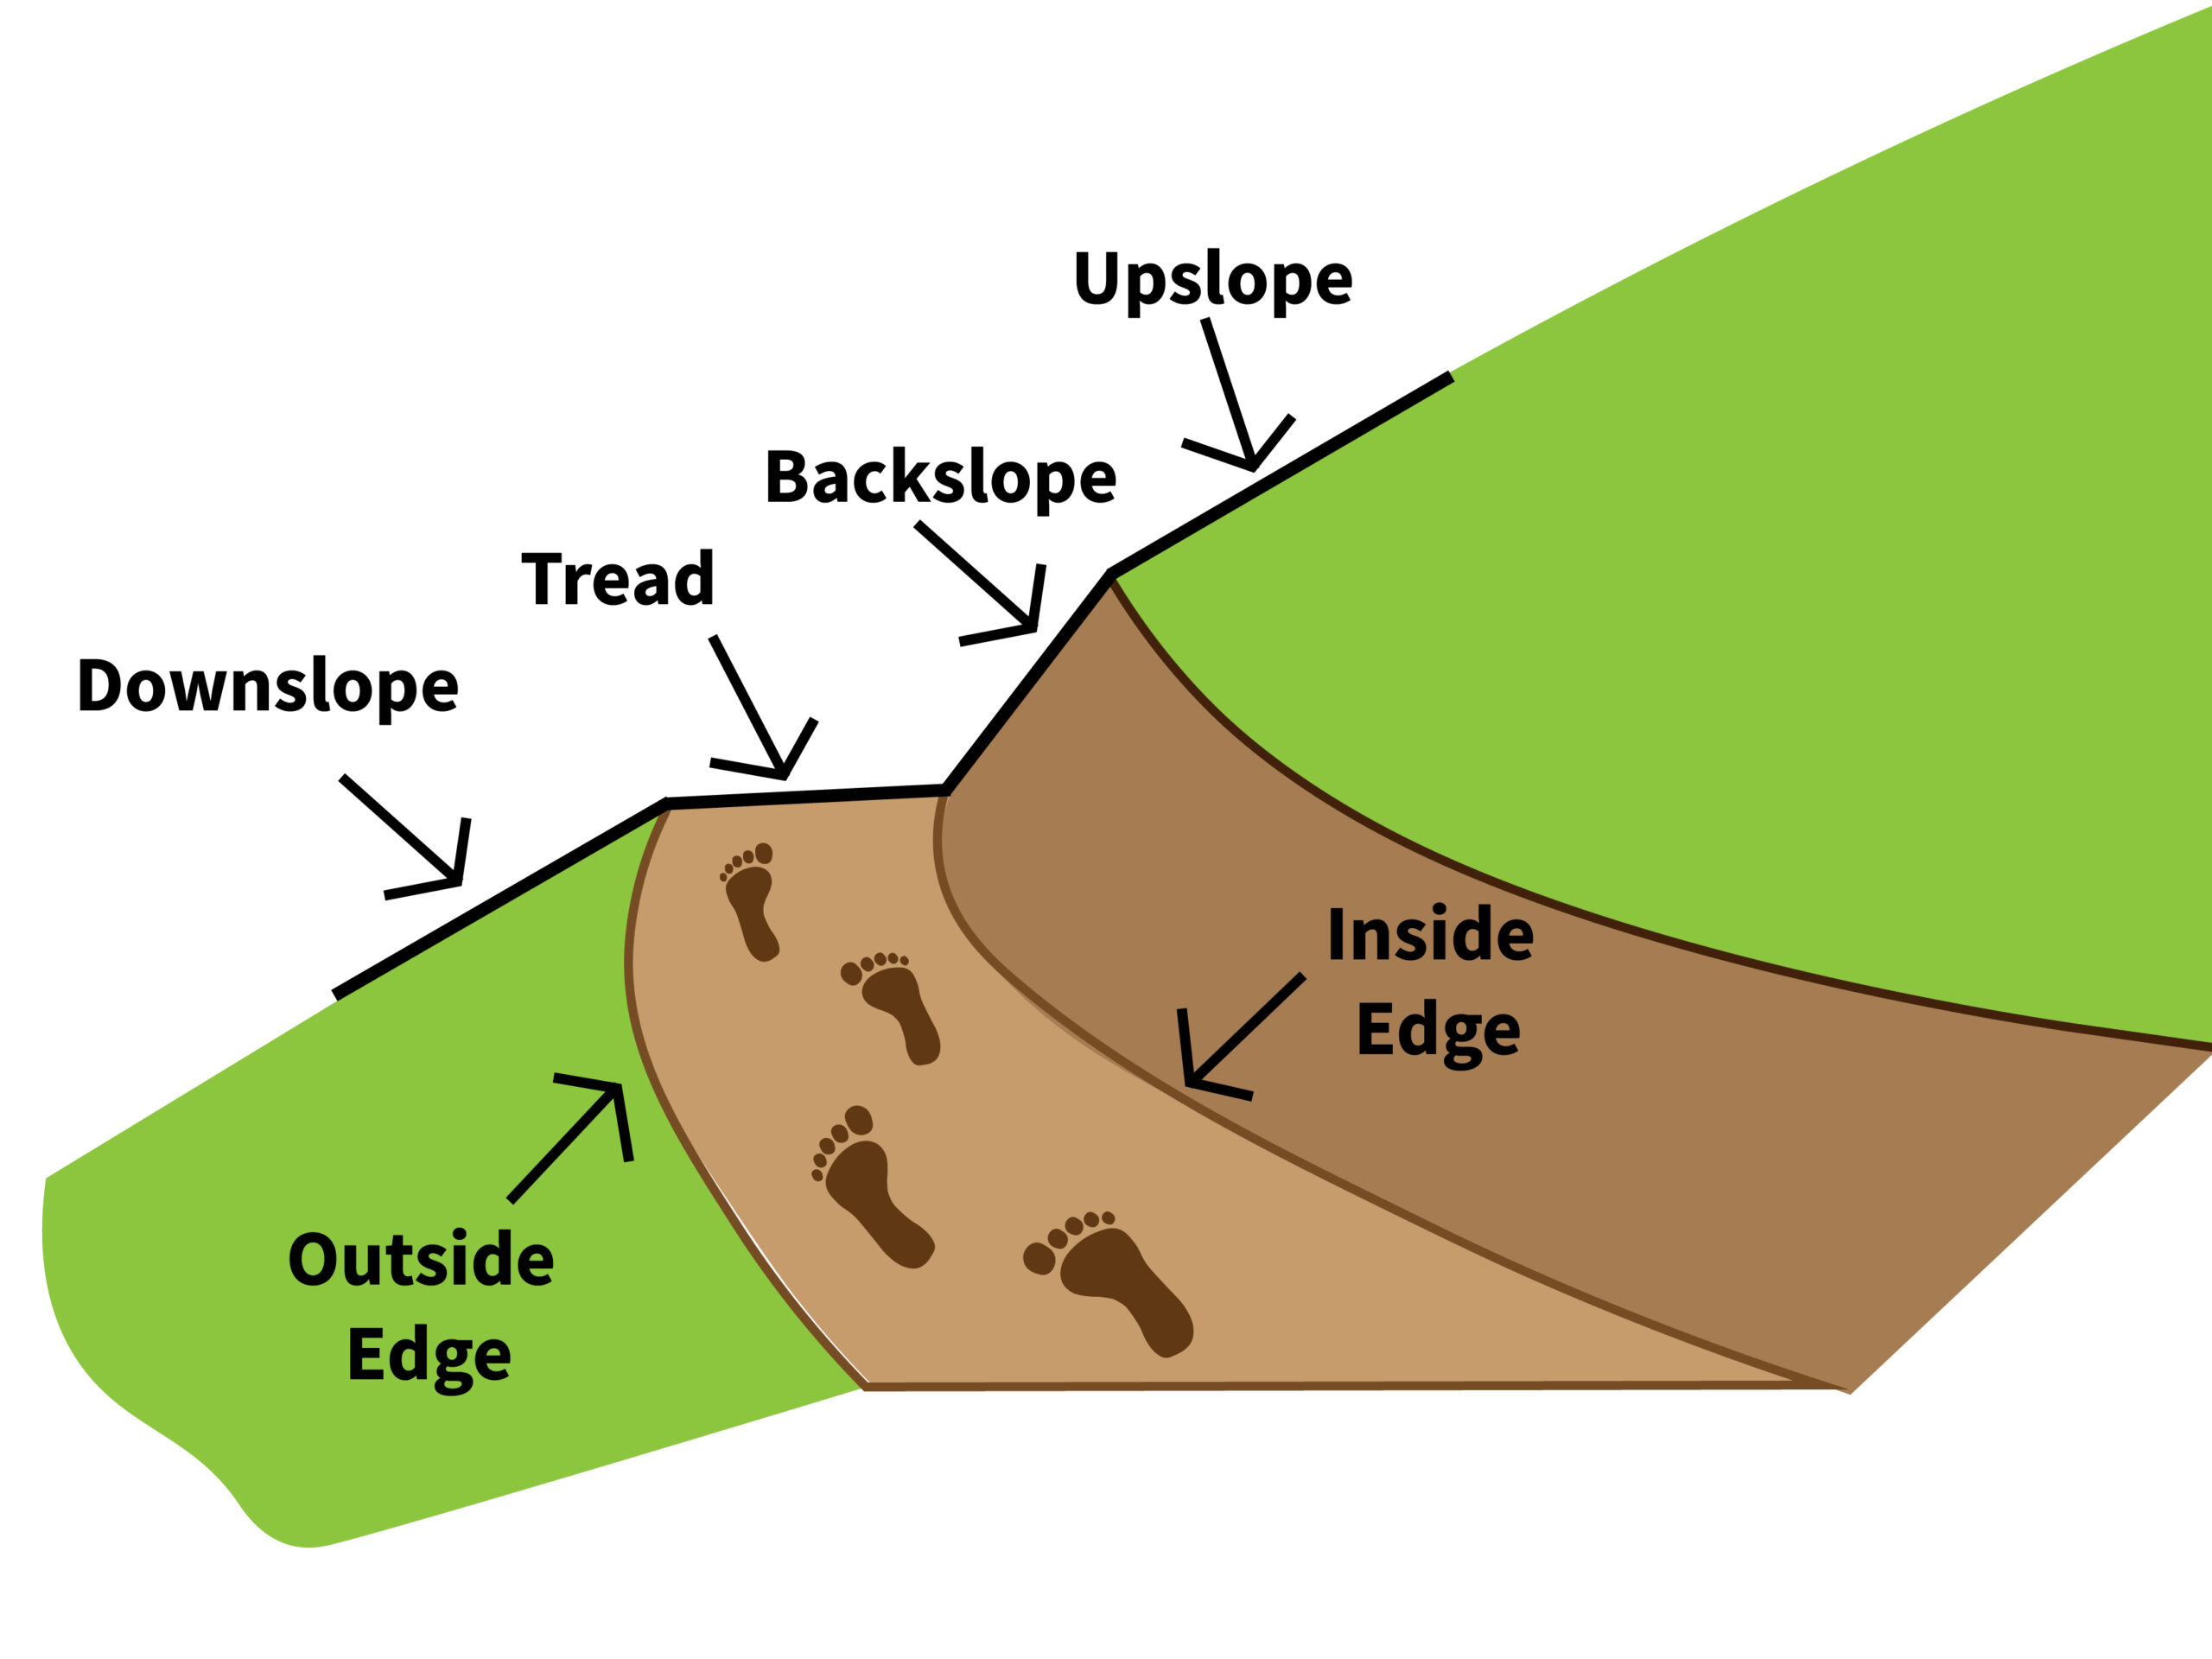
Before you start trail building, it is important to know the parts of the trail. The diagram below shows the components of a trail and the terminology we use.
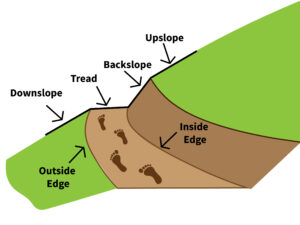 Tread – Tread is where you walk on the trail. It is usually 1.5 to 2.5 feet wide and at a 5 degree slope downward across the tread. This outsloping allows for rainwater to run across the trail instead of pooling on the trail.
- Backslope – The backslope is a transition from your tread to your upslope. It should be less than a 45 degree angle in order to minimize falling dirt.
- Upslope and downslope – these are the natural slopes of the hillside above and below your trail respectively.
- Inside edge – This is where the tread meets the backslope.
- Outside edge – The outside edge is incredibly important. If you walk on the outside edge it will cause the edge of the tread to erode away. Always make sure that your outside edge is slightly lower than the inside edge so that water can drain. The outside edge should not have any dirt piled up or have logs that would block the flow of water across the trail.
4. What Makes a Trail “Good”?
A good trail should be easy to hike, long lasting, and interesting. Yet, it can be difficult to make those two things happen.
When building a trail, the first concern is “will it be hiked?” If you build a perfect trail that avoids all the major sights, no one will use it. Similarly, if you build a trail that is difficult to walk on – maybe it is very sloped and uneven – people will avoid your trail.
Poorly designed or constructed trails will cause people to carve their own social trail. Social trails are trails that are forged as people walk or ride over them. Since they are never built with proper drainage in mind, they can be damaging to the landscape and cause erosion.
The other factor aside from usability, is drainage. If your trail cannot allow rainwater to drain off it, then it will erode away. This guide will address the main ways that you build a trail with effective drainage. Much of this consideration is given during the surveying portion of the trail development.
Trail Specifications
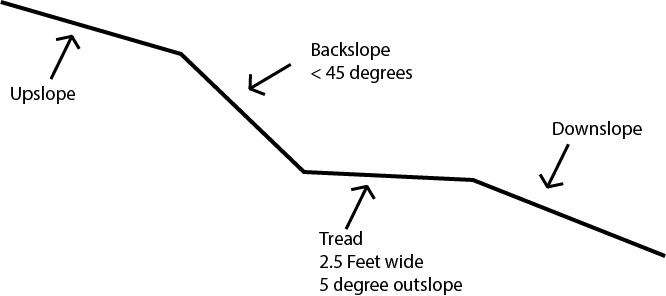
Trails can vary, but stick to approximate measurements to help with effective drainage. The backslope should be no greater than a 45 degree angle. This is known as the angle of repose. This means that it is the steepest the backslope can be without the dirt sloughing off and eroding quickly.
The tread itself should be from 1.5 to 2.5 feet wide, and should be out-sloped by about 5 degrees. This means that the trail should be angled down slightly, so that water does not sit on the trail but rolls off it.
5. Surveying a Trail
The first part of building a trail is to map out where it will be. This is called surveying. The first part to surveying a trail is getting a rough idea of where you want the trail to go. What the starting and ending points are. From there, find points along the route that you want to make sure the trail goes by, maybe a cool rock formation or scenic overlook.
After you have a rough idea of where the trail should go, it is time to mark the actual trail. You need to pay attention to the percent grade. The percent grade is the slope of the trail. A 6% grade means that for 100 feet of trail you increase or decrease by 6 feet in elevation. Trails should not exceed 10% grade.
To measure your percent grade, you will use a tool called a clinometer. You hold it up to one of your eyes and look through while keeping both eyes open. You will see a ruler with percents next to it. Since only one eye is looking into the clinometer, you will see the ruler overlayed on the trail in front of you. The red line will tell you what percent grade you are at.
When using a clinometer, chose someone who is of similar height to you. Have them stand down the trail and see what the percent grade is when looking at their head. This will give an estimate of the grade of the trail between the two of you.

Take a look at this picture. Can you guess what the percent grade is? Check you guess at the end of this section!
Monitor the grade as you map out your trail, making sure that you stay within the recommended guidelines of 10% grade or less. Anything more, and drainage becomes a bigger issue. And it will just be a difficult trail to hike!
How to take drainage into consideration
When surveying you want to know that your trail will allow for effective drainage of rainwater and not cause erosion. The first step is to never go directly uphill with your trail. You should follow what is known as the 1/2 rule. What ever the grade of the hill is, never use a grade bigger than 1/2 of that for your trail, capping at 10%. So if you have a hill of 16% grade, make your trail close to 8%. Follow this grade as you go up the side of the hill at an angle, as shown in this picture.
Additionally, you can employ grade reversals throughout the trail.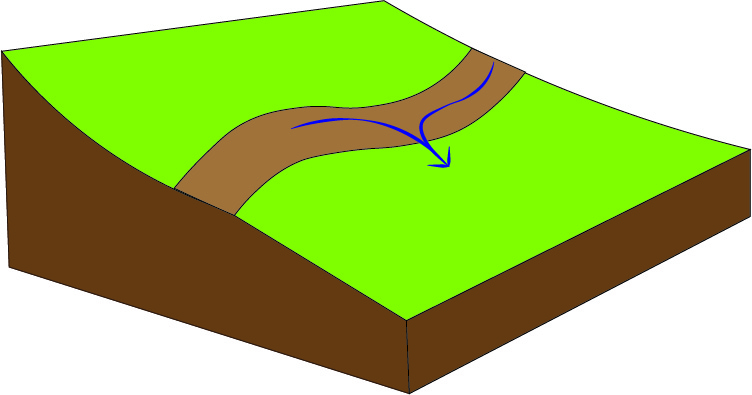 This means that periodically throughout the trail, allow the trail to go between negative and positive percent grade. This prevents water from flowing down the trail and gaining momentum as it goes straight down the trail. The figure to the right shows how the water will roll off the trail when a rolling grade reversal is employed. Keep this in mind when surveying your trail!
6. Trail Building Part A – Corridor
After you have surveyed your trail, you can start on construction. This means clearing your corridor, often referred to as grubbing. Corridor refers to the zone beside the trail that needs to be cleared of vegetation.
Make sure that you have marked the outside edge of your trail with biodegradable flagging tape, or pin flags. From there, you can use hand saws, loppers, power trimmers, or brush mowers to begin removing vegetation. Generally, remove a few feet of vegetation on each side and 8 feet high. You need not remove all grass on the downslope, as this will make the trail look wider and unnatural. If power equipment is used to clear the corridor, the debris can be removed using a high speed leaf blower.
Shrubs and Trees
When removing shrubs, trees, or other vegetation, make sure to flush cut plants (i.e. cut even with the ground). This will prevent the plants from coming back up and requiring more maintenance.
If there are trees along the trail, remove branches that overhang the trail, cutting the branch flush with the trunk. When trimming branches, do not cut all the branches off one side of the tree leaving it lopsided. Additionally, the entire tree does generally not need to be removed unless it either obstructs the flow of the trail, or you have already removed over half of it’s branches.
Rocks and Roots
If large rocks, stumps, or roots are going to obstruct your tread, you may want to remove them. For rocks, place rock bars underneath the rocks and use them to pry. You may need to put smaller rocks under your rock bar to give you more leverage. Never place your hand under large rocks, especially when they are being held with a rock bar, or you risk serious hand injury.
If a stump can be left, it is often easier to do so. To remove a stump, use a Pulaski, cutter-mattock, or ax to chop through the roots. Saws are not recommended here, as you will dull the saw in the dirt. Once the roots are cut, you can pry the stump out of the ground.
Make sure to warn anyone downslope of you before tossing rocks, branches, or other brush.
Backfilling Holes
If you decide to remove a large rock or stump, you will be left with a hole in your trail. Simply filling it with dirt will not work, as nothing will hold the dirt in place. Instead, you will need to backfill the hole with a mix of gravel and dirt. Use a sledge hammer to pulverize rocks that you find along the trail in the hole, then add dirt back on top. You can then use a tamper to pack down the soil. Remember not to use a McLeod for tamping!
6. Trail Building Part B – Tread
Building the tread requires a few steps. The first process is to excavate the trail. The KTC uses a full bench cut. This means that we put the entire tread on undisturbed soil. A half bench cut would excavate half the tread, then use the excavated soil to building the remaining part of the tread. This leads to a less sustainable trail in the long run.
To excavate, start by using a pick mattock or pulaski to cut into the dirt. Remove excess dirt until you have a rough outline of the trail. If you are working somewhere steep, cut out one section of the tread so that you have something to stand on, then work down the trail.
You should swing the mattock like a golf club and gently shave away the top layer of dirt so that you have the most control while shaping the trail.
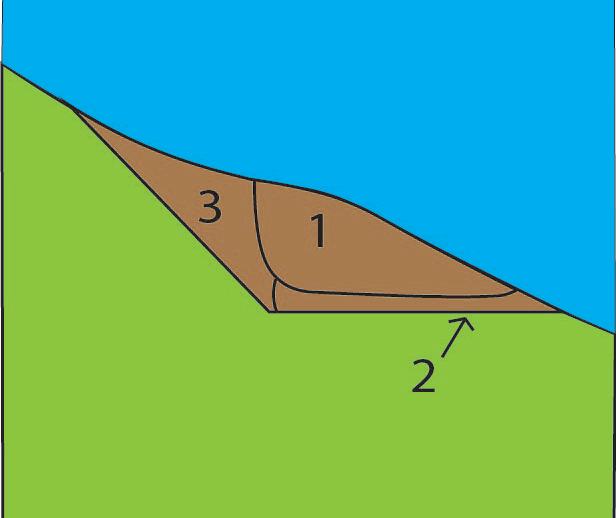
Referring to the diagram to the right, you can see what order to excavate the trail. The first section is a rough outline of the tread (1). This provides the platform to work on. From there you can outslope the trail and ensure that you have a clean outside edge (2). You can lay a water bottle on the tread to see if the water is level or slightly slanted, indicating the slope of the trail.
As you are creating the tread make sure to periodically use a McLeod and shovel to remove any loose dirt. Pay attention to were your outside edge is and do not step on it. If you frequently walk on the outside edge it will erode it away and force you to dig farther into the backslope to maintain the proper tread width. Standing a McLeod on the tread will help determine whether the proper outslope has been achieved. It should lean slightly toward the downslope edge rather than standing straight up.
The last part of excavating is the backslope (3) which we will discuss in the next section.
6. Trail Building Part C – Backslope
After you have a tread formed, it is time to start the backslope. 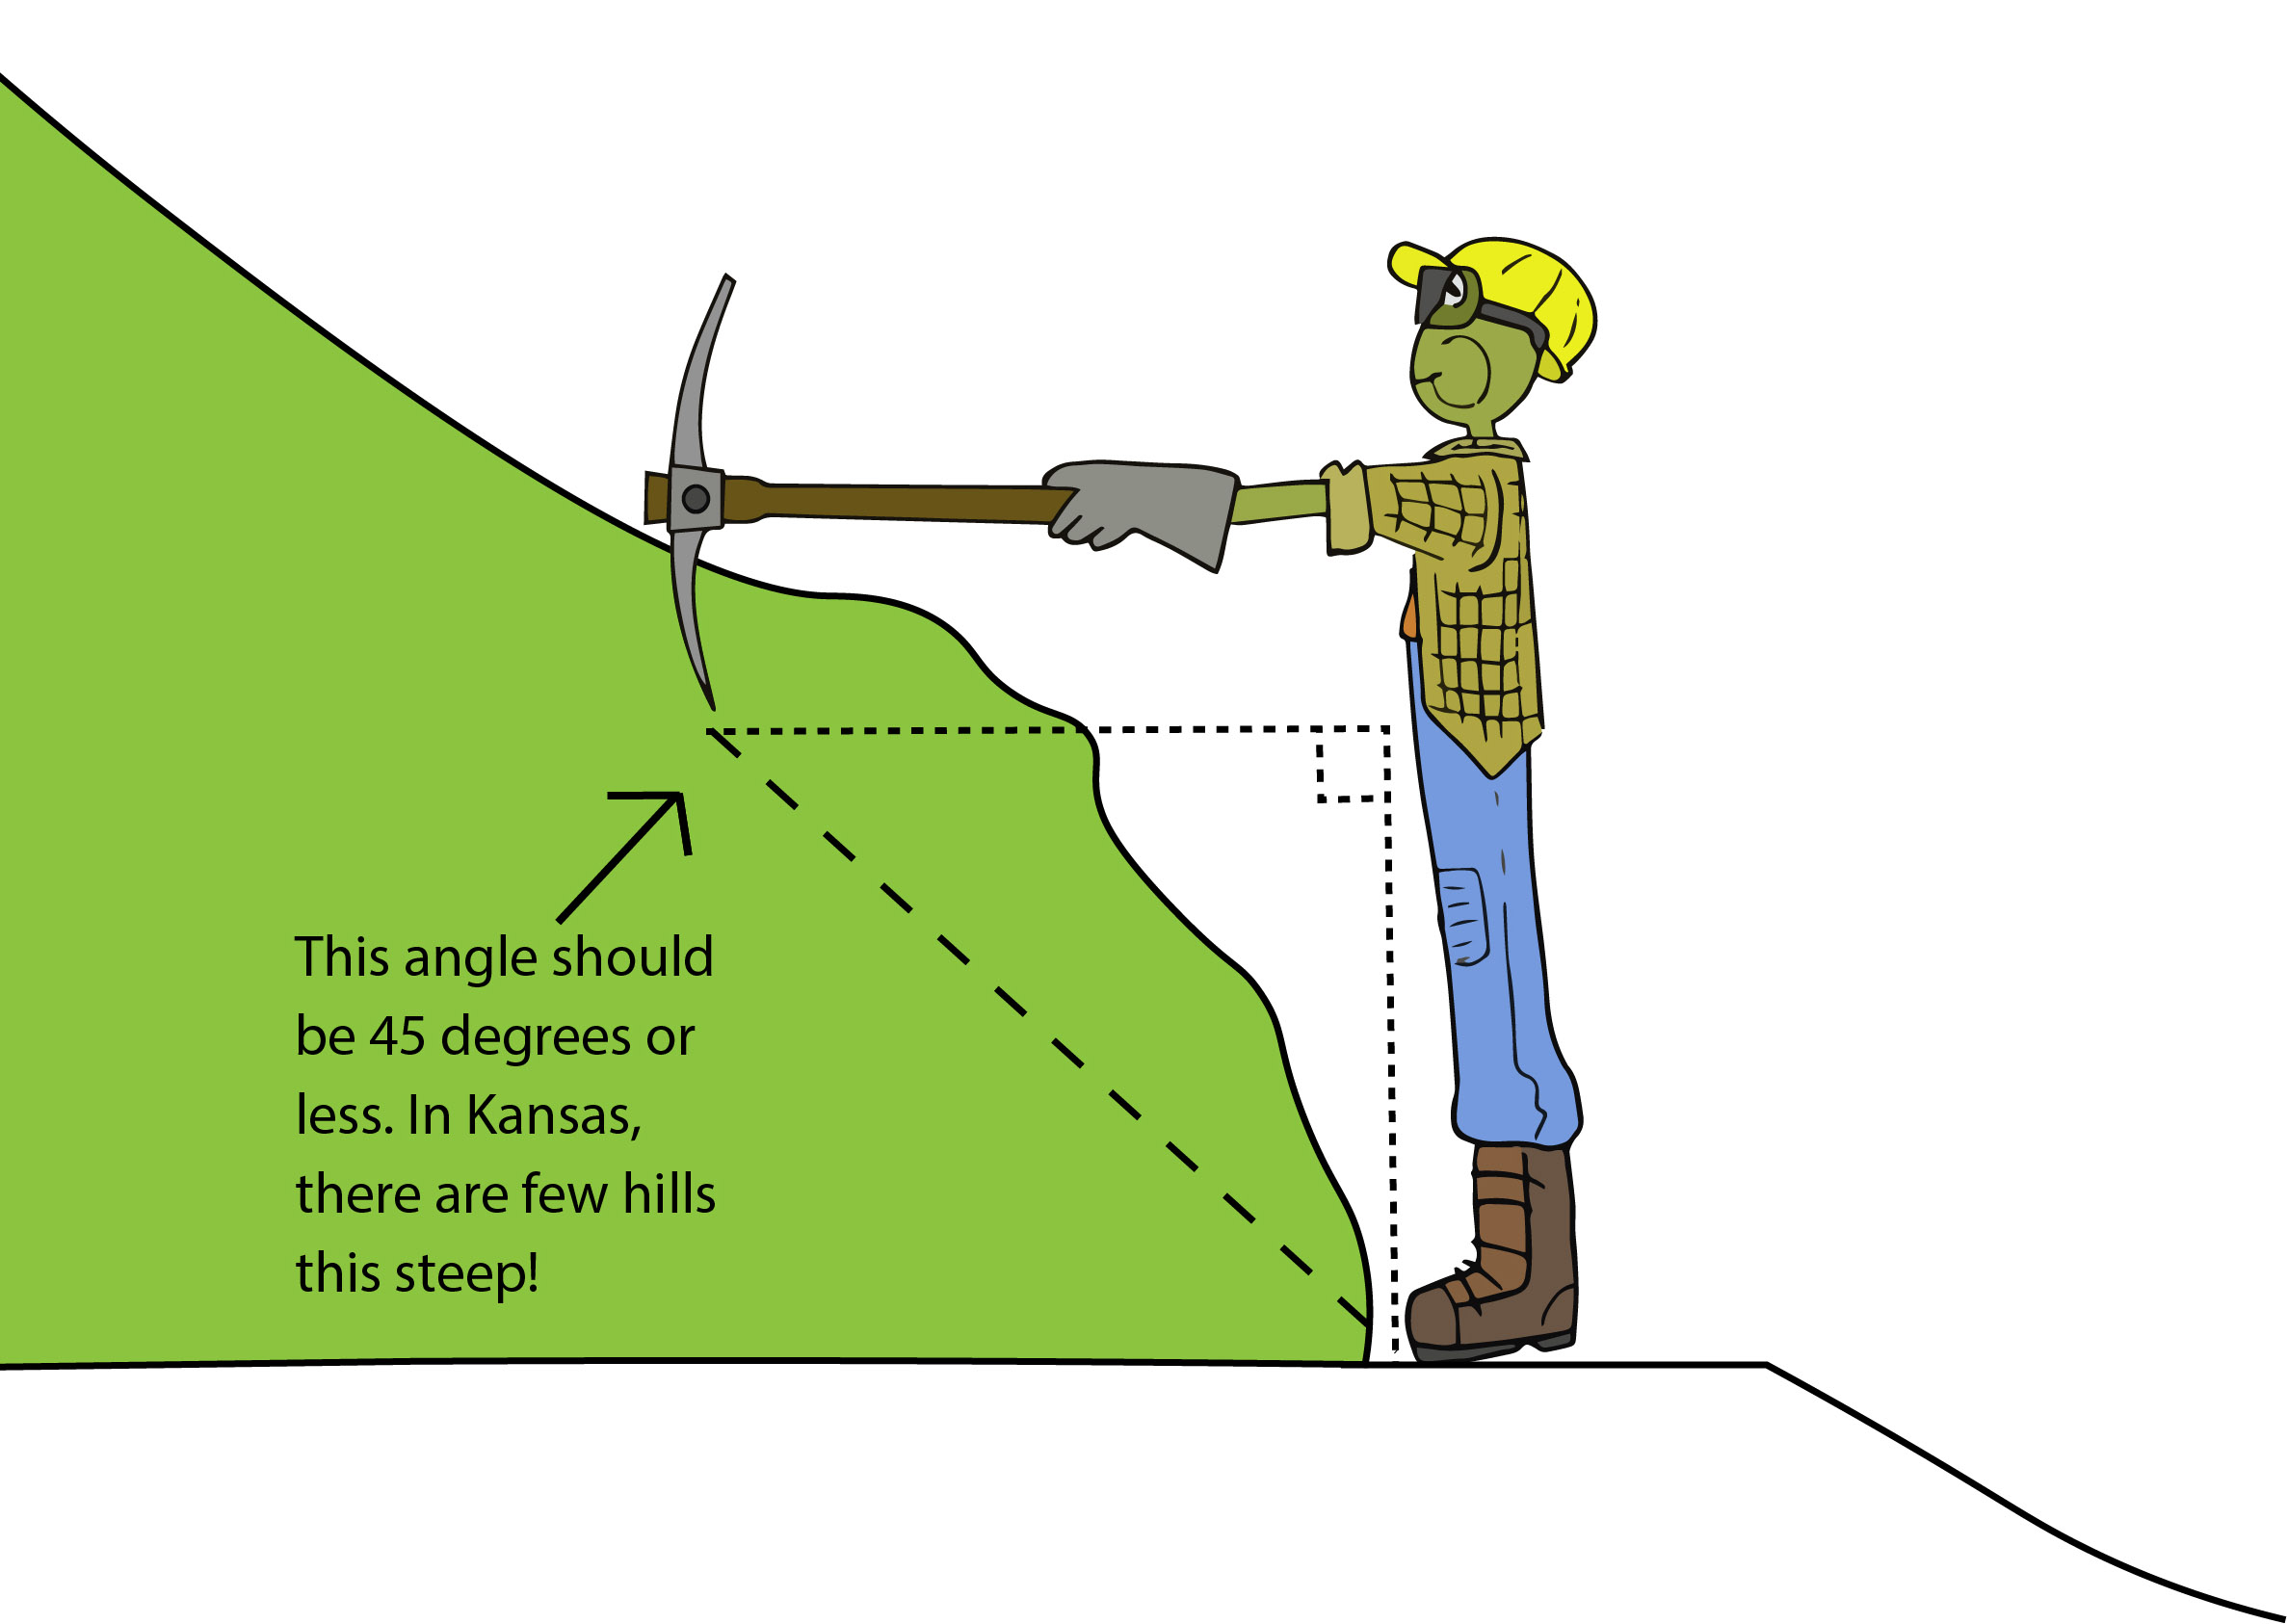 To determine where your backslope should start, stand with your feet touching the inside edge and hold a mattock out parallel to the ground and let it fall until it hits the soil (see diagram to the right). Wherever your mattock hits is approximately where the backslope should start. Make sure that the backslope is not greater than a 45 degree angle. This is known as the angle of repose. This angle is the steepest the backslope can be without the dirt sloughing off and eroding quickly.
While shaping the backslope, it helps to put one foot on the backslope and one foot on the tread to keep your back from bending while you work.
As with the tread, use the McLeod to smooth the backslope and pile up dirt to be shoveled or raked downslope. Do this periodically so that you get a good idea of what your trail looks like while you work.